About Stan

It's me.

Media Arts – Elements of Art Assignment

Element of Art: Line

原宿にて (At Harajuku) by Frank Huang


This picture’s composition leads the viewer up a vertical line. The boulevard’s strips of green and white, coupled with the motion of the cars speeding down the road draw you up. The trees’ branches block the horizon and further centre the focus on the cars further down the street.

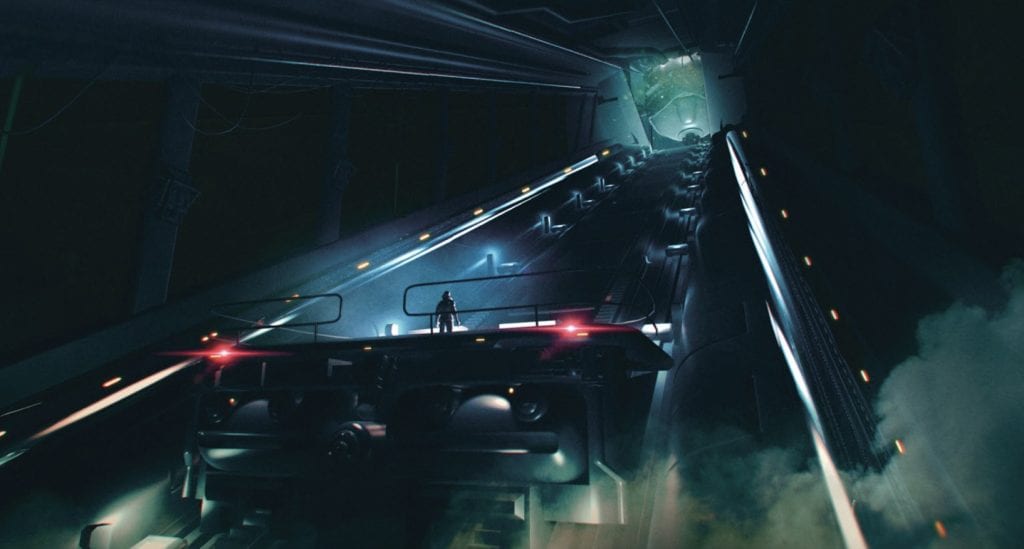
Polaris Exploration – found in The Art of DOOM, artist uncredited

The composition in this work is much like any other piece featuring a tunnel: the light at the end is emphasized by lines pointing in its direction. The viewer is effectively led to the end by strong contrast around the light, and, once again, lines leading up and to the right.

Element of Art: Colour

duck!

color by Cuba Gallery

The blue of the lake, velvety in texture, contrasts the orange eyes of the seabird.

Ice by Gleb Alexandrov

Purple and orange light plays off the chunk of ice and contrasts the grey-and-blue ground.

Element of Art: Perspective

Amsterdam by Mario Cuitiño

Two of Amsterdam’s bridges are visible in this photo, and the bikes in the foreground look very large in comparison, the play in perspective is very apparent.

Car Challenge by Zacharias Reinhardt

The boy setting off the invention is just as big as the far-off car, showing a property of perspective.

Element of Art: Space

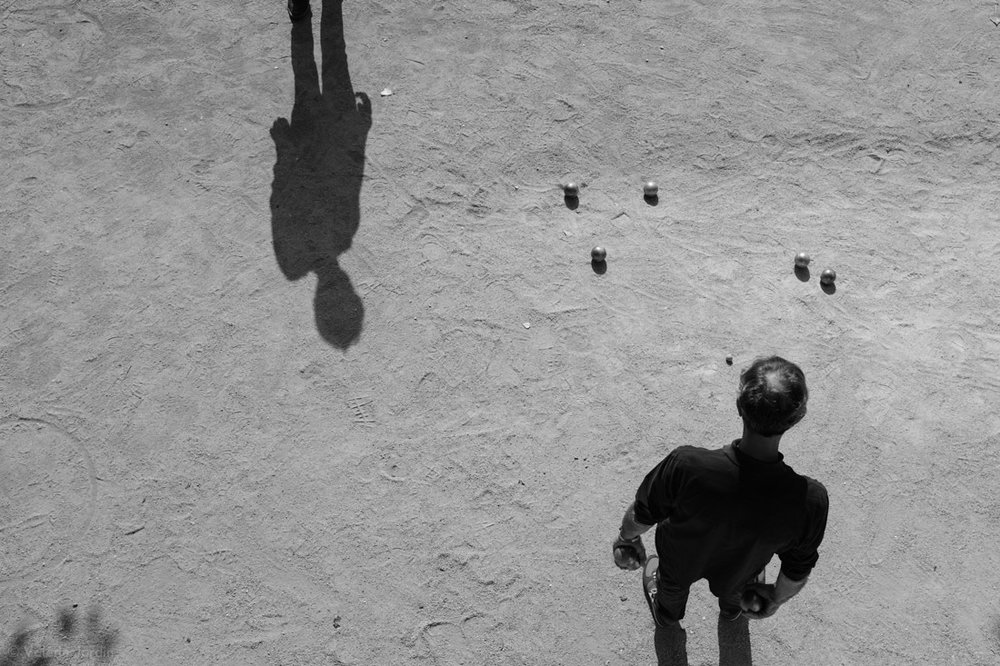
by Valerie Jardin

The grey sand in this black-and-white piece serves as negative space between the subjects. The men and their balls are separated by the sand, and the photo is balanced so that each man gets roughly half the photo’s space – it is split diagonally somewhat.

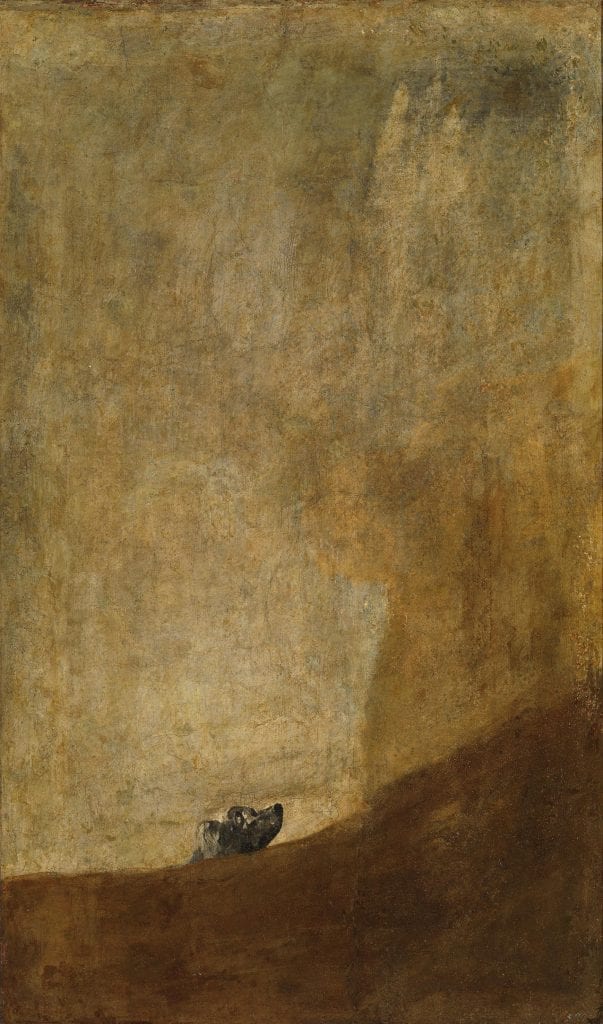
The Dog – Francisco Goya

Goya’s “Dog” positions a small dog’s head in a vast expanse of canvas and paint. The space shown here is very dramatic and puts more emotion into the piece – everything is big and wide open, in contrast to the small dog, who looks up towards the ochre sky. The painting’s original title is unknown, it is most commonly called “The Dog,” or “El Perro” by the art world.

Element of Art: Framing

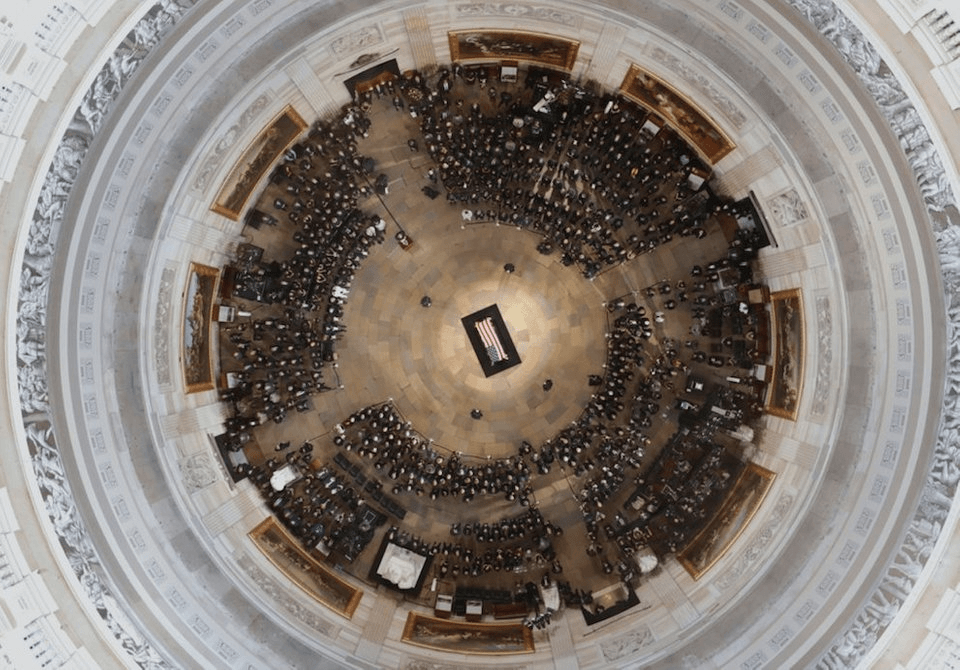
Image by Morry Gash

The dome’s edge frames this photo in marble, and the blue light reflecting off the marble gives contrast to the warmer hues in the centre of the piece. The framing also extends to the centre of the image, as the floor of the building is made of tiles arranged in concentric circles – everything points towards the casket in the middle.

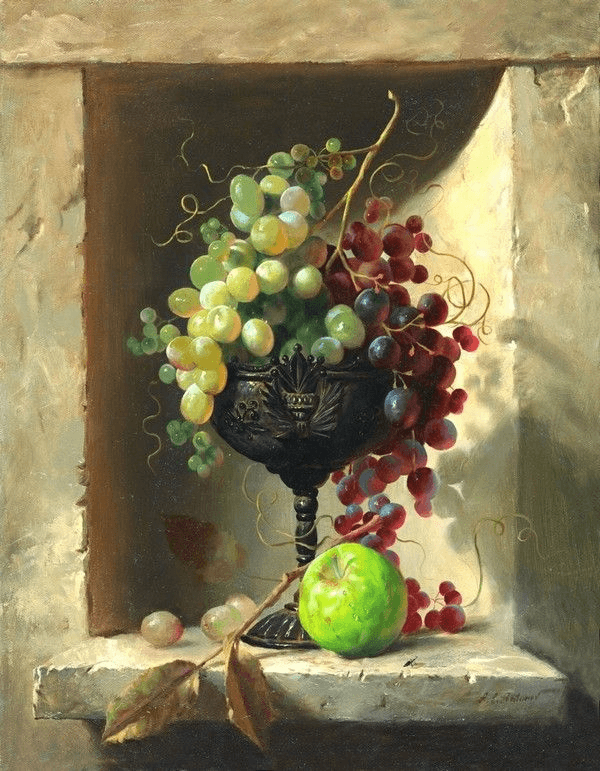
Still Life with Grapes and Apple by Alexei Antonov

The edges of the alcove in this piece draw the eye to the centre of the painting, and wash the background with shadow as to contrast the highlights on the subject. The piece thus has great contrast without being too dark, thanks to the way the light bounces off the walls.

Element of Photography: Rule of Thirds

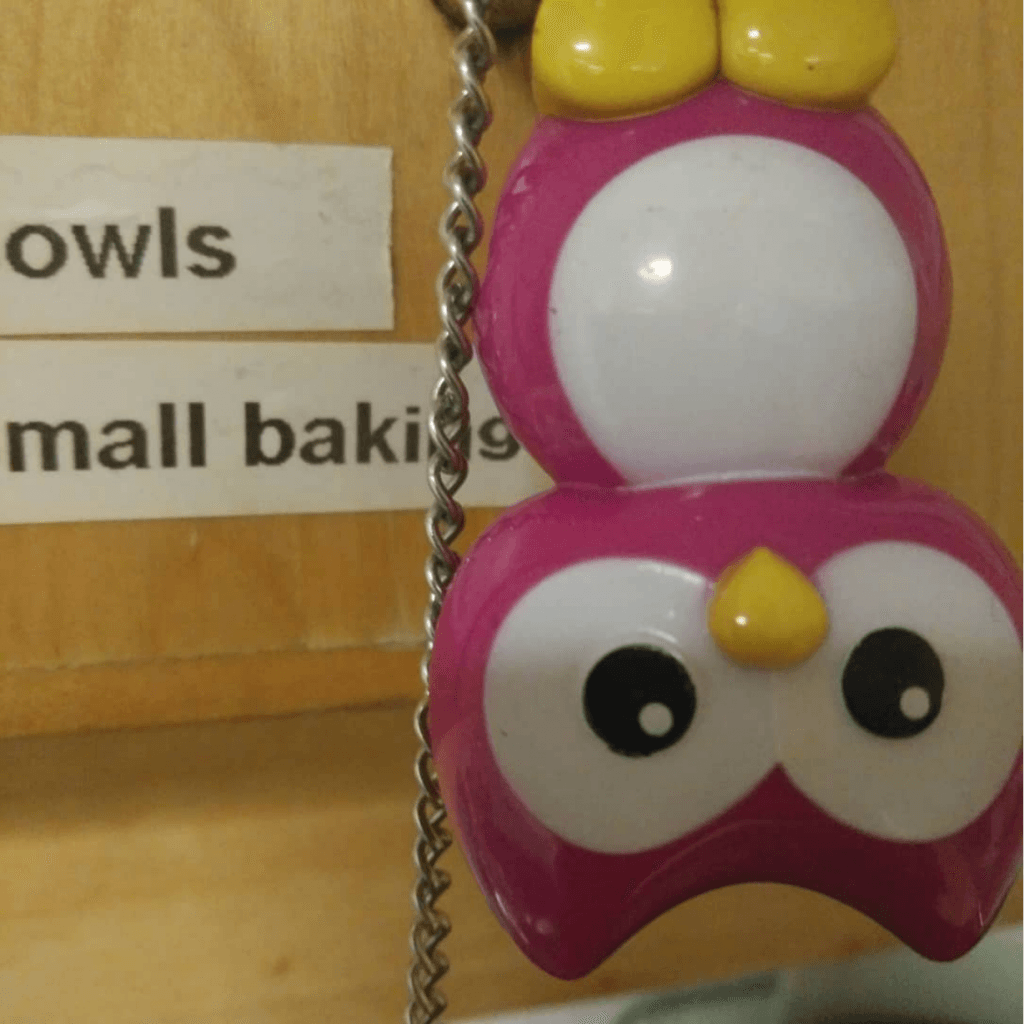
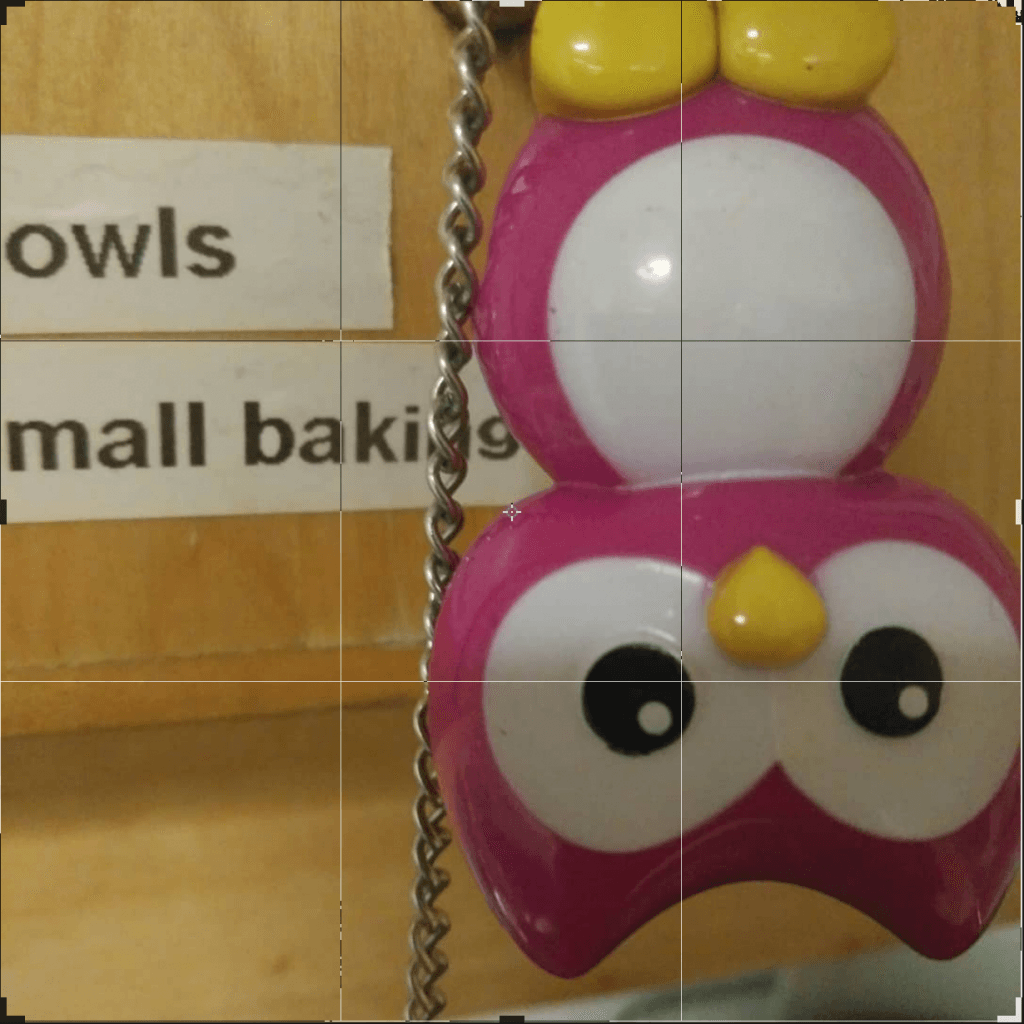
Owls! – Original Work

This photo’s elements fall neatly into the rule of thirds: the centre and right third hold the owl, the upper third’s bottom edge is aligned with the label, and the eye rests in the corner of the lower and right third.

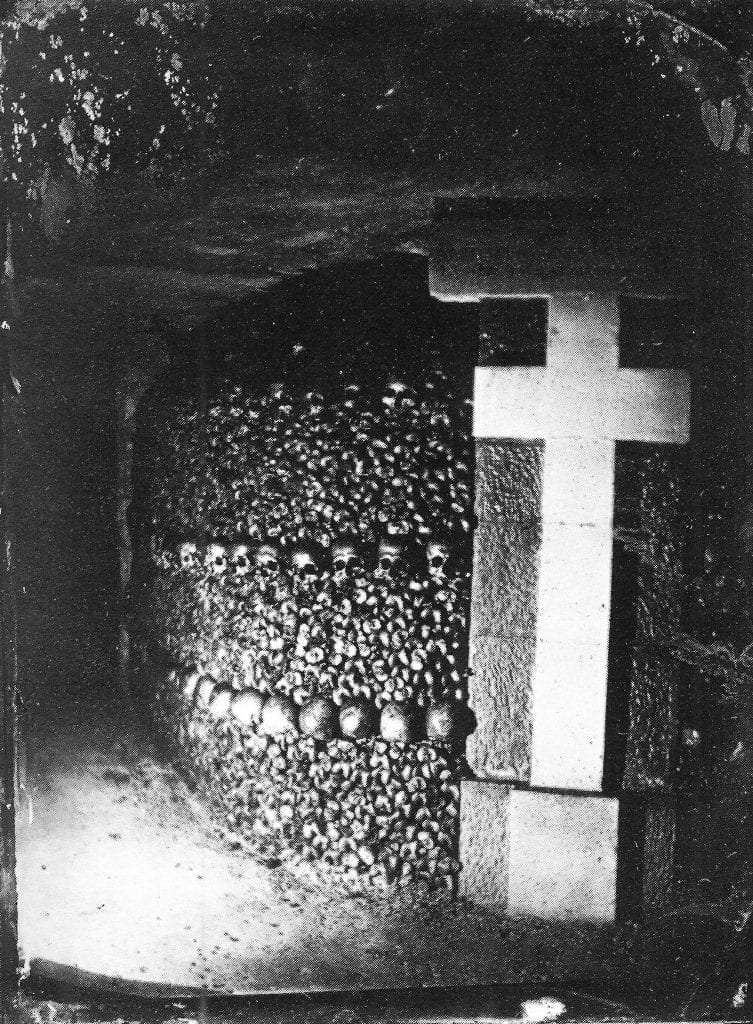
A photo of the Parisian Catacombs, taken in 1861 by Félix Nadar.

The cross in the photo takes up the right third, while the rows of bones and skulls fill the centre and left thirds. The lines of the upper and lower thirds are traced by the skulls, curving away from the camera, leading the viewer deeper into the catacombs.

Element of Photography: Shape and Form

A freeze-frame from a Dutch oatmeal ad

The layers of this image are clearly defined: the shapes of the people in the foreground are the biggest sources of 3D form, and the background fades into one layer of only 2D shape.
“A tale of two old bitties” by Reddit user Teamsamson

The forms in this photo are concentrated in the top half of the picture, the two ladies, table, cat, and sofa populate the top of the frame while the bottom is left sparse and grey.

Element of Photography: Texture

Grass Closeup by Tim Horton

The depth of field and intense focus on the subject makes it pop out and feel like grass. This photo hardly has any colours other than green, which serves to intensify the effect.

Midsummer Bonfire Closeup by Janne Karaste

The focus on the fire and embers makes the photo feel very hot and dry. Light fills in the cracks of the charred wood and adds detail to the texture of the piece.

Fourth Inquiry: Rough Idea

Here’s the rough idea for my fourth inquiry: I’m gonna draw.


My overall goal is to produce 5 well-made drawings, and complete a drawing course from Udemy. (This one)

I’m consulting multiple resources in pursuit of my goal, not just Udemy’s drawing course. There’s a reddit community called /r/ArtFundamentals and its associated website, people whom I’ve previously met that have helped me to draw, as well as a large sample of artistically-inclined students at our very own school; These are all resources which I intend to make full use of as I continue with this project.

There is the question of what constitutes a “well-made drawing,” and I feel that my criteria for such a thing are pretty straightforward:  a full-page drawing preceded by at least a couple of sketches (that is, more than one sketch,) of the same subject.

Simple short summary: drawwwwwww.

Second Inquiry: Practicalities

I’ve decided to use a GUI framework called Kivy to make Crampack. It’s a feature-packed Python 3 library that runs on most major operating systems and works on mobile. I’ve already made the suggested example project, and I have a basic grasp on how it works.

There’s a lot of resources available to learn from, but I’ve mostly been looking at the official Kivy documentation, and asking questions about it on the IRC.

I plan to draw up some design bits to outline the look of the application in the near future. These will give me a more concrete idea of Crampack’s final look, and all of the various screens, how they’re organized, and how control flows between them.

Overall, I’ve been spending less time on my inquiry than I’d like to, and I hope to remedy that in the coming days. The design drawings will be finished a day or so from now, and I’ve already got a basic layout to work with, code-wise.

Second Inquiry Details (Also a plan!)

I made a little post a while ago concerning an idea that I had. I want to turn this into my next inquiry project and make the things I outlined in the post a reality, so let’s get started.

First of all, what is this thing, anyway? My goal for this inquiry’s end product is a unique productivity application (another one for the sprawling pile) that runs on phones and computers.
(this is basically a reeeeaaaally rough reference document detailing most of the functionality that I want this thing to have. its implementation will be covered in another post, and the initial Crampack post takes care of the motivation.)

I want you to be able to:

  • utilize task management via cycles
  • add time-based and activity-based milestones for your cycles
  • add cycles quickly, in 1 click/tap/action
  • get notifications when your milestones trigger, or to remind you when to work on something/what to work on
  • look at all your cycles at once in a special screen (like 20+ at a time)

I want cycles to look something like this:

  • each cycle has a start timestamp and an optional end timestamp
  • cycles serve mostly as reminders to work
  • attach milestones to cycles for a sense of achievement
  • arbitrary colour to distinguish them
  • horizontal “timeline” view of all the cycles:

/-----|cycle1
---/------------:cycle2(ongoing)

There should be a (pomodoro) stopwatch to track activity on each cycle.

Inquiry Project Update

Hi! This is an update detailing what I’ve done so far in regards to my inquiry project. (Couldn’t have guessed from the title, huh?)
Over the past two weeks, (they felt like four days) I’ve done a lot of stuff. 14 days ago, my project had nothing, but now it has something.

The first step in executing the wonderful plan that I’d laid out for myself was transporting my computer there… unfortunately this was going to take a little while on account of the fact that I couldn’t get a ride to school until the next Wednesday, and had to take the bus. (Can’t really bring my computer on the bus, can I.) So, 5 whole days that I had to work on the project at home.

Not a lot of things got done in this period of time, but I did manage to pack up all of the components neatly, and install some necessary packages on the system. I researched some tools that I could use to render out the uploaded files automatically, and came upon “fsniper,” a tool that does EXACTLY THAT. (using inotify, which is great!)
So that was nice. I couldn’t get it to work on my laptop, but I had high hopes for the system in school.

When I did finally get the PC into the computer lab, I set it up within the first day of it being there. There was a persistent issue with the system’s Bonjour hostname not showing up on the network, which mean that I had to scan the local network to find the machine manually… which was quite the annoyance. ssh, the software I used to connect to the computer, refused to work for some time until I reconfigured it, but that was resolved rather easily.

I had some issues setting up FTP, because the pure-ftp daemon couldn’t be configured to use its virtual users instead of the system’s real ones. I ended up just making an actual user account to use with FTP, and that was basically the end of any problems there.

pure-ftpd was easy to install, but had some more issues with file permissions. It seems that it didn’t correctly support read-only directories for some reason… great. This is still a bit of an issue, and I think that I’ll have to come up with a system of shell scripts to deal with it.

Right now… everything works. It’s not completely pain-free and it doesn’t have all of the bells and whistles that I wished it would, but everything works. I’ll need to make sure that rendered files can’t overwrite each other, and I really want to support rendering animations (especially packaging the rendered frames into an archive and putting that in the download directory instead of all the frames.)

Overall, most of the things I set out to do, I did do. I didn’t have a lot of trouble, and truth be told, I don’t know if this is a good size for the first inquiry. I knew most of what I needed to do, and the details I found out through a lot of Googling. (sometimes duckduckgoing)

If you want to know more about how the system works, in more detail… You should be on the lookout for more of my stupid blog posts! Coming soonish.

Crampack

A simple productivity tool idea (Crampack)

I think your high-school education can be broken down into what I’m going to call “cycles.” Every period of work is a cycle – the studying involved in the buildup to a test, the work put into an assignment or project, it’s all cycles. Each cycle has a start and an end, the end usually being the time you stop working on something outright because it’s finished. So, given this idea, we can build some cool productivity tools! (maybe)

I love git.:)
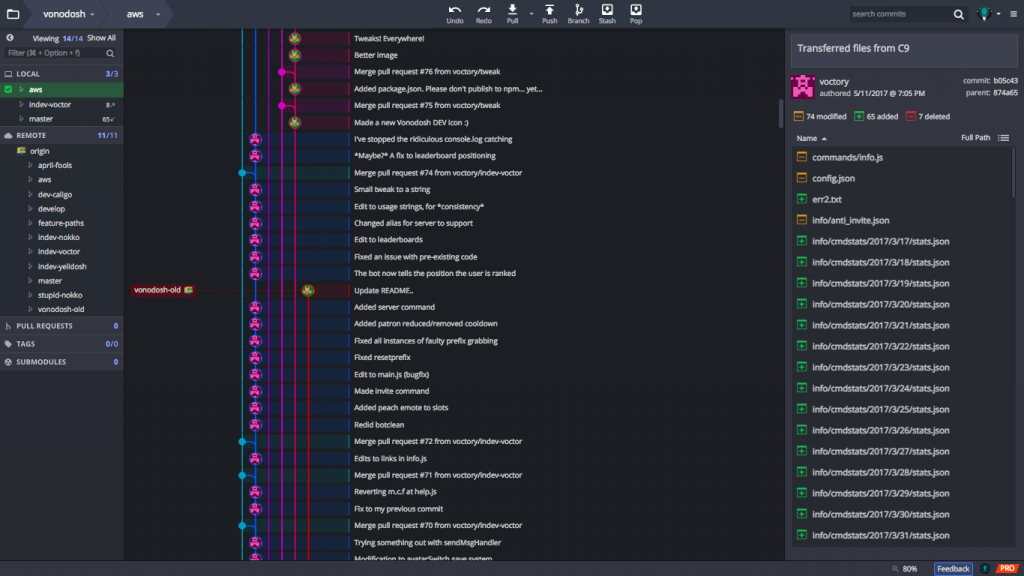
If you don’t know what git is, I can summarize: it’s a system for storing and manipulating changes that have been made to a file. This is really useful in software development, when every change may need to be undone at any time. It’s really pretty to look at a “tree” view of your files and how they change, and really useful be able to tell how many different versions of a file you have active at any given time. I think just logging every change I make to a piece of code has greatly boosted my productivity, because writing down what a particular change does causes me to think “Yes, this is what that does. I did a thing, my life was not wasted.”
So why not use this addictive tree thing to make a productivity app?

My ***&*&*(VERY)*&*&*** barebones concept is as follows:

  • You have a basic structure for productivity: the node.
  • Nodes form chains, the “cycles” I mentioned earlier.
  • Nodes have timestamps, names, and optional descriptions.
  • Nodes don’t have to be progress updates, they can just be simple due dates.
  • Cycles have a start node, and an optional end node. They also get descriptions, names, and a goal. (just some text)

So the point of all this is to represent your workload as a series of discrete workloads that build up into their own end goals. This is because you usually have more than one thing you should be working on at any given time, and most high school-sized workloads have distinct tasks that you need to complete to get to your goal.

So far what we have is basically a journal and a simple calendar/timekeeping thing. I think that this concept could be further supercharged with something like nodes that have dates in the future, milestones of what you should have achieved by that point. (Those would somehow get removed as you added actual progress update nodes and what have you.)

I’m thinking of developing something like this in software form to help with my educational woes that are inevitably going to turn up later in the school year. Or not. I don’t know. I’m not the boss of me.

yet…


Let me know what you think about this, o avid reader of my ramblings. Perfectly good comment box down there. Unused.
I’ve pre-christened this idea “Crampack” because… you ‘cram’ before a test… and it’s catchy. Maybe you can re-pre-christen it.
Or un-re-pre-christen it.

Also: this is very bad, I’ve not read it over thoroughly, and I’ve posted this half an hour past the time I should be sleeping at.
Sorry!

Inquiry Details (Also a plan)

Hoi!

I’d like to write for a little bit about the kind of thing I want to do for my first inquiry of the year. Let’s start with a problem.

I like using Blender. It’s a pretty popular 3D modelling/video editing/node-based compositing/sculpting/animating software package with a killer feature: all of it is free and open source. My computer, however, doesn’t like using Blender. Rendering out projects takes an embarrassingly long amount of time. (I should point out that this is true of any 3D renderer on most computers)

So the solution seems pretty obvious to me – find/salvage/summon from the void/make a computer that can render out Blender projects like there’s no tomorrow. Now, I also want to do a public service to the school and make this computer’s frankly silly amount of power consumption massive rendering power available to the students that may be interested in it.

Let’s get our thinking caps on and figure out how we’re going to design this machine!

First of all, let’s quickly cover the hardware the we have to work with, and then get started on the software side. I happen to own an ethereum-mining computer, meant to generate the best cryptocurrency. It doesn’t work as well as it used to, and doesn’t really make a profit anymore, so it’s (financially speaking,) okay for me to use it in this project. The computer is kitted out with a basic 7th-generation i3 processor(I’ll update this later when I remember or find out what it actually is,) 4 AMD GPUs, 8GB of DDR3 RAM, and two (count ’em!) power supplies, one attached to the motherboard and two graphics cards, the other attached to a paperclip and two graphics cards. The GPUs are the real meat of this machine, we have one R390X available to us, two Sapphire(upd8 later) cards, and another (whose name will also be updated later.)

OpenCL support in both of Blender’s render engines is pretty experimental, so I think that the performance of this rig could be better with nVidia cards… but you work with what you’ve got. On the software side of things, I considered a couple of options for giving students access to the rig, and I’ll list two of the options that didn’t make the cut here:

  • Setting up a web e-mail address and checking it for messages with attachments every once in a while

I think that this is a bad idea because it requires writing custom software, for which I have absolutely no time given the close deadline of the project, and because it would be horrifically easy to screw up writing it and give random people on the internet the ability to run arbitrary code on the school network. So, not a good time.

  • Setting up a local web server that accepts file uploads

This would be fine if it didn’t require me to write more software… which, you guessed it, I’m not very fond of at all. Most of the problems with the previous idea are averted though, due to the local network restriction. I wrote up some code for this idea, but it kinda failed due to my lack of experience with writing any kind of web server applications.

Let’s move on to the winner:

  • Setting up a local [S]FTP server that requires a login and password to access.

Guess what, it’s absolutely perfect! Most of the files I’ll be writing to make this plan work are config files, [S]FTP is easy to set up on a Linux machine, and I’ll mostly be able to know exactly who is uploading what files. Plus, there are many friendly SFTP web-interfaces out there, and most everything that has a filesystem, has [S]FTP support.

So that’s the file transfer mechanism down, let’s see what we can do about actually rendering all of the files we’ll receive.

I think that, again, simple is best in this scenario, and that rolling my own software to deal with this is not at all perfect. So, I feel that a simple cron system would be quite easy to write up, and even easier to maintain. A cronjob would run every couple of minutes, checking for any new files, and rendering them out. Fortunately enough, blender itself comes with a command-line mode, which means that it should be very easy to do this. Once rendered, the files are removed, and the resulting image file should be rendered out to some public download-only [S]FTP directory. That can be done using blender’s command-line options.

Maybe I’ll draw a nice graph to describe this whole process later, but it’s quite simple, isn’t it?

To summarize:

  • I’d like to make a server on the school network that can render .blend files.
  • It should accept files from registered/authorized/whatever students via [S]FTP and maybe a web client
  • Every few minutes, a cronjob should render any new files in the “uploads” directory, delete them, and put the image file in a “downloads” directory

To be frank, I think that the most difficult part of this project will be setting up the drivers for the AMD graphics cards on Linux, and getting them to work with Blender.

Well, it’s been nice writing and I’ll see ya later.
-Stan

Another week at iHub

Today is Friday, the 15th of the month of September. School has started, sweat is in the air, all that good stuff. I’m not awfully flustered or anything, but so far my work habits haven’t been perfect – I think I’ll have to do a bit of work over the weekend.

We’re starting our Inquiry projects pretty soon, so I think that I’ll need to haul my giant computer™ over to the school and fire it up pretty soon. I’m not sure if I will be able to work on it outside of school, so I may just need to use my DCL time as intended, and work on my Inquiry exclusively in school.

I might make a post soon detailing how I plan to set up my inquiry, (and more importantly, detailing what it actually is) but that will have to wait for now.

Well, gotta get to class. More posts coming.